
How to curl hair with straightener comes down to two things most tutorials skip, the right prep and the right wrist motion, because even a great flat iron won’t give you consistent curls if your hair isn’t set up to hold them.
If you’ve tried before and ended up with weird kinks, curls that drop in 20 minutes, or that crunchy “burnt bend” look, you’re not alone, straightener curls have a learning curve, and small details change the result fast.
This guide keeps it practical, you’ll see which technique matches your hair length, what temperature range usually makes sense, and how to troubleshoot the classic problems without doing more heat damage trying to “fix” it.
What you need before you start (it matters more than people think)
Before you even clamp a section, set yourself up for a curl that looks clean and lasts, especially if your hair tends to go limp.
- A straightener with smooth plates, ideally 1 inch for most hair lengths, wider irons can work but feel clunkier for tight curls
- Heat protectant on dry hair, even coverage, not just a quick mist on the top layer
- Clips for sectioning, fewer passes equals less frizz
- A light hold product if your hair drops fast, mousse or styling spray often helps more than heavy hairspray upfront
According to the American Academy of Dermatology Association... limiting heat exposure and using heat protectant can help reduce hair shaft damage, which is why “one slow pass” beats “three quick passes” in a lot of real bathrooms.
Choose a curl method based on the look you want
Most flat-iron curls are a variation of “twist and glide,” but the direction and speed change the final shape. Pick the goal first, then match the technique.
Quick curl style guide
| Goal | Best technique | Section size | Common mistake |
|---|---|---|---|
| Loose waves | Bend waves (S-shape) | 1–1.5 in | Holding the bend too long, leaving dents |
| Soft curls | Classic twist-and-glide | 0.75–1 in | Going too slow, causing a crease |
| More defined curls | Full rotation wrap | 0.5–0.75 in | Wrapping too close to the scalp, heat risk |
| Modern “undone” texture | Alternate directions | 1 in | All curls the same direction, looks dated |
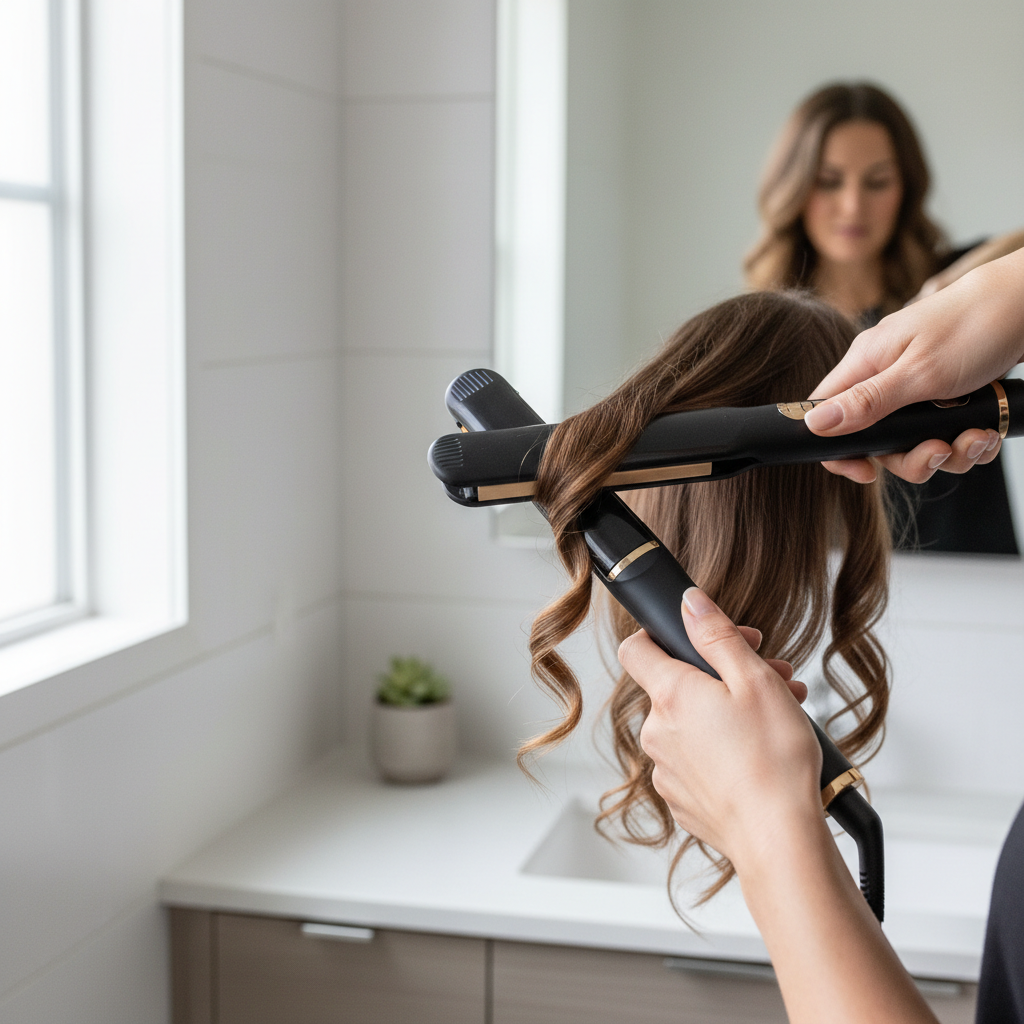
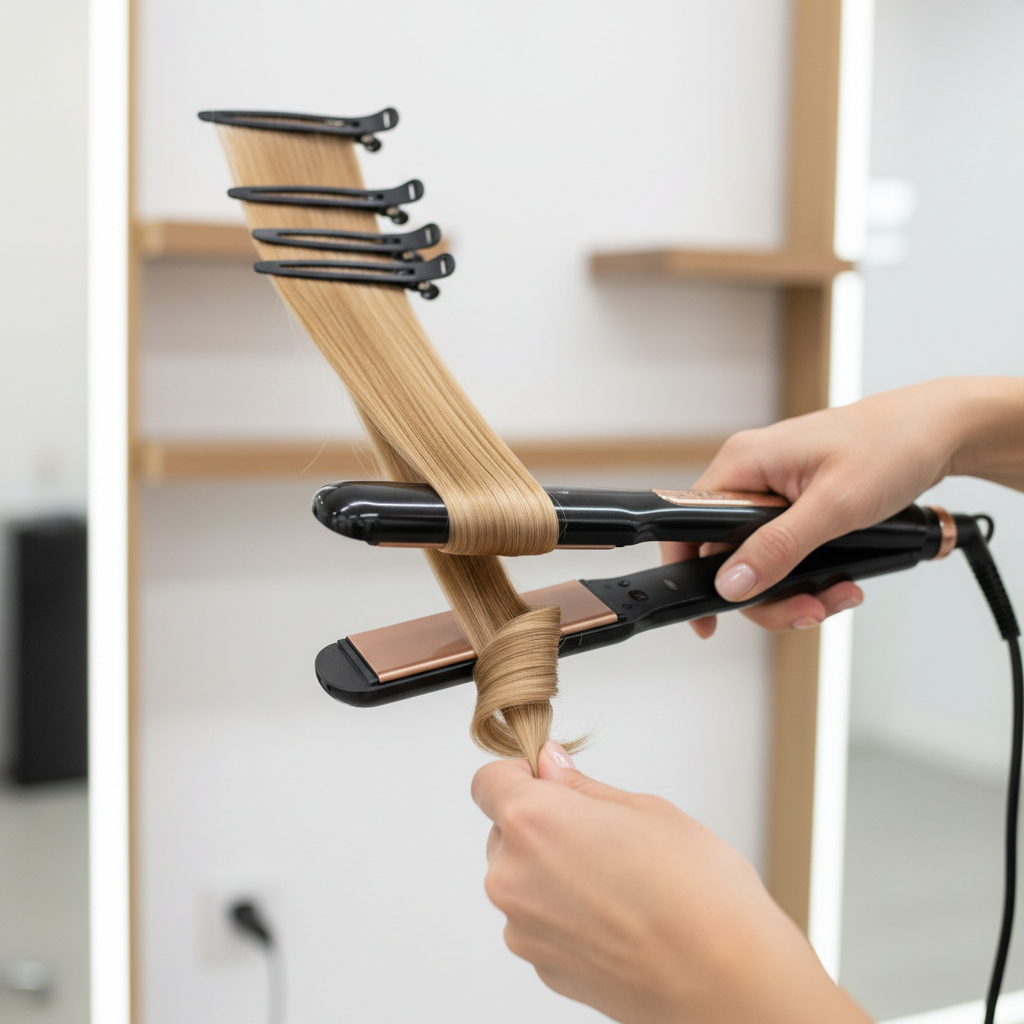
Step-by-step: how to curl hair with a straightener (the core technique)
This is the baseline method that works for most people, most hair types, and most 1-inch flat irons. Once your hands learn it, you can tweak it for beach waves or tighter curls.
- Start on fully dry hair, if hair feels even slightly damp, stop and dry it, damp + heat can be rough on the cuticle
- Section your hair, two to four zones usually keeps it manageable, smaller sections curl cleaner
- Clamp near the root but not on the scalp, leave about 1 inch of space
- Rotate the iron 180–360 degrees away from your face, this sets the curl direction
- Glide downward smoothly, steady speed, no pausing, pausing creates the classic flat-iron kink
- Let the curl cool in your hand for a second or clip it up if your hair drops fast
Key point: your hand controls the curl, not the heat. Most “my curls won’t hold” issues are really “my rotation and speed aren’t consistent yet,” which is annoying, but fixable.
Temperature and hair type: a realistic starting point
People love a single “best temperature,” but it varies by hair density, color treatment, and how healthy the ends feel. If you’re unsure, err lower and do one controlled pass rather than chasing a curl with repeated heat.
- Fine or fragile hair: often does better in the lower range (around 250–300°F), plus a smaller section
- Medium hair: many people land around 300–360°F, depending on hold and history of color
- Coarse or very resistant hair: may need a higher setting (often 360–410°F), but only if you can move smoothly without multiple passes
If your hair is bleached, heavily highlighted, or feels stretchy when wet, consider keeping temperature conservative and talking with a stylist, heat tolerance can be very different after chemical services.
Self-check: why your straightener curls aren’t working
If you’ve tried to curl and it “kind of works” but doesn’t look right, run this quick checklist, it usually reveals the real issue in under a minute.
- Curls fall out fast: sections too big, hair too clean and slippery, or you’re not letting curls cool before touching
- Creases and dents: clamping too hard, stopping mid-glide, or rotating after you clamp instead of during
- Frizz on the outside: going over already-curled hair, using too much dry shampoo before heat, or hair ends are over-processed
- Ends stick out straight: you’re releasing too early, or you’re “ironing” the ends flat as you finish the pass
- Curl looks uneven: changing rotation amount from section to section, or inconsistent speed
Fixes and upgrades that make curls last (without stiffness)
Once the technique feels okay, longevity becomes the next battle. The trick is adding grip and structure without turning hair into a helmet.
Try this sequence for longer hold
- Light mousse or styling foam before blow-dry if your hair is very soft, it builds internal support
- Heat protectant on dry hair, then wait 30–60 seconds so it doesn’t feel wet
- Clip curls to cool for 5–10 minutes if you can, this often makes a bigger difference than extra heat
- Finish with flexible hairspray after curls cool, then gently break them up with fingers
One more thing people fight, brushing too soon. If you want big waves, use your fingers or a wide-tooth comb after the hair cools, a dense brush can turn fresh curls into frizz fast.

Common mistakes and safety notes (avoid the “fried ends” spiral)
Heat styling is common, but problems pile up when you chase perfection with extra passes. Keep it boring and controlled, your hair will look better for it.
- Don’t curl damp hair, if you hear sizzling, stop
- Don’t park the iron mid-strand, even a brief pause can leave a bend mark
- Avoid repeated touch-ups on the same pieces, re-curl only the sections that truly need it
- Watch the ends, if they feel rough, lower heat, use smaller sections, and trim when needed
- Be careful near the face and ears, burns are common, if you’re unsure, practice lower down the strand first
According to the U.S. Food and Drug Administration (FDA)... consumer guidance for personal care devices typically emphasizes reading instructions and using products as directed, which sounds obvious, but it’s also how you avoid the “my iron snagged and took hair with it” moment.
Conclusion: a simple routine you can repeat
When you strip it down, curling with a flat iron is prep, sectioning, a confident rotate-and-glide motion, then letting the curl cool before you mess with it. If your results feel inconsistent, slow the process down, not the iron movement, tighter sections and smoother passes usually beat higher heat.
If you want a next step, practice on just the top layer for three sessions, aim for consistent rotation and speed, then start alternating directions for a more modern finish.
FAQ
Why do my curls fall out when I curl with a straightener?
Most of the time it’s section size or cooling time, hair needs to cool in the curled shape to “set.” If your hair is very fine, a light mousse before drying can help, and finishing spray works better after curls cool.
Is it better to curl away from the face or toward the face?
Away from the face tends to look more open and modern on most people. Many stylists alternate directions through the head, but keep the front pieces away from the face for a softer frame.
How do I curl short hair with a flat iron without burning myself?
Use smaller sections and clamp a bit lower than you think, you don’t need to start right at the root. A narrower iron can feel easier on short cuts, and practicing the wrist motion mid-length helps reduce slip-ups.
What size straightener works best for curls?
A 1-inch iron is the most flexible for waves and curls. Wider plates can still curl longer hair, but they’re less forgiving for short hair or tighter shapes.
Should I use hairspray before or after curling?
For most people, after works better because it avoids a sticky pass with the iron. If you need extra hold, use a very light mist before curling and let it dry fully, otherwise you risk more snagging and uneven shine.
Why am I getting those sharp creases in my hair?
Creases usually come from pausing or clamping too hard, especially when you rotate and stop. Keep the iron moving at a steady pace, and don’t squeeze the plates like you’re pressing a shirt.
How can I get beach waves with a straightener instead of curls?
Use bigger sections and do gentle bends, create an S-shape down the strand, then leave the ends slightly straighter. A texturizing spray after cooling helps, while too much shine serum can make waves collapse.
Is curling hair with a straightener bad for hair?
It can be, depending on heat level, frequency, and hair condition. If you notice breakage or a rough texture, lowering temperature, reducing passes, and asking a stylist for a care plan is a safer move.
If you’re trying to streamline mornings, it often helps to pick one repeatable technique, set a sensible temperature range, and stick to it for a week, once your hands learn the motion, you can adjust the finish products and section size to get the exact curl pattern you like without turning styling into a 45-minute project.